
Ladies Lingerie Blouse - 1911
By Alice Maxwell
The lingerie type of waist and gown among spring and summer fashions that few are willing to let the seasons go by without buying a new blouse or two or a lingerie frock entire.
The severity of line and much expanse of a plain surface are entirely out of order where these delicate modes are concerned, and tucks and insets must be used with a rather lavish hand.
However, this does not of necessity mean that only expensive laces and embroideries can be employed, bargain edgings and insertions by the piece answer splendidly, merely that the effect must be somewhat “fussy" to be right.
Handwork is, of course, the most exquisite decoration that could be used, and if you are smart in that way, you cannot only improve your, gown or waist but save some of the trimming expenditure.
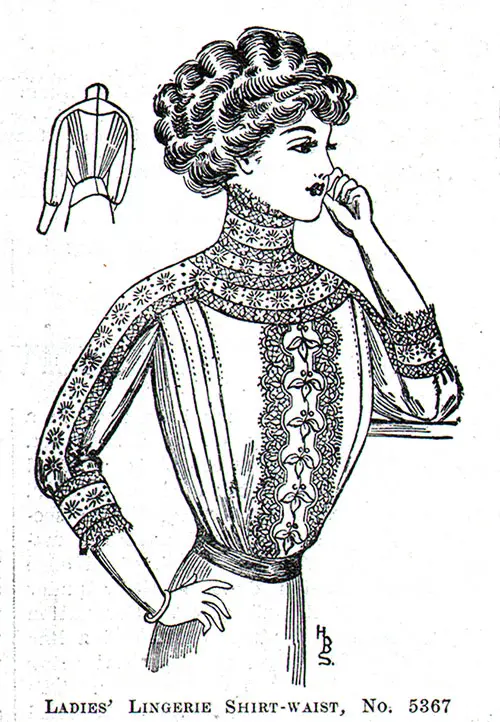
There is an excellent spacing for handwork on model No. 5367 at the front, where appliqué embroidery trims in the picture, and another opportunity is afforded by the yoke and upper sleeve section as well as collar and cuffs, the hand-work to fill the spaces between the rows of insertion.
This design may be used as a separate waist or for a lingerie dress in combination with a skirt which should be attached in one-piece style. To help you carry out this idea, I am going to describe in the next lesson a skirt of the lingerie type.
The waist is excellent for either purpose. Its distinctive feature is the one-piece yoke haying extensions which form the upper sections of the sleeves.
This is a little novel and besides gives the fashionable flat shoulder effect and an opportunity for continuing the insertions in a practical design.
The sleeve is completed by an under-section in one piece and can be made in full or three-quarter length, as preferred.
The Dutch or open neck is not a feature of the design, but any of you who particularly like it may leave off the collar and trim out the neck at the front.
The small tucks each side of front and back are not only decorative but provide fullness and becoming ease in the fit of tile waist. A peplum finishes the lower edge, but, of course, will not be needed if the waist is to be combined with a skirt to make a lingerie dress.
Batiste is perhaps the most satisfactory of the lingerie materials, although lawns may be used and the fine figured swisses. Cluny, Valenciennes, and baby Irish are splendid trimming laces.
This waist was made of batiste, one and three-fourths yards thirty-six inches wide, with a yoke of eighteen-inch all-over embroidery, one and one-eighth yards, a front panel of batiste embroidery, one-half yard, and six and three-eighths yards of Valenciennes insertion.
Narrow edging, five-eighths yards, finished the cuffs and an-other one-half yard trimmed the top of tile collar. These quantities are for medium size, and the larger sizes will be found on the pattern envelope.
For the three-quarter length sleeve, cut off the cuff piece at the cross line of large perforations; this gives you the shorter cuff needed. Some of the pieces have a triple perforation at-one edge.
In cutting, this perforation must be placed along the fold of the material, so the piece can be cut double. Fold the material length-wise for the front and peplum.
Fold the all-over lengthwise for yoke and collar, hut the embroidery being but eighteen inches wide, the yoke will require a piecing near each shoulder. Baste or carefully pin the piece to be attached before laying the pattern over it.
Arrange the other pieces, back, under-sleeve section and cuff, so that the line of three small perforations in each will be lengthwise of the goods, or parallel to the selvage.
Pin all the pieces and cut out, paying particular attention to the notches in sleeve section and yoke, as these pieces are a little unusual in their shaping and the grooves help very much in joining edges correctly.
To indicate on the material the location of tile perforations needed in the making, use colored thread and take a few loose stitches at each perforation.
The perforations that you should mark in this way are the small perforations indicating the tucks, the double perforations marking gathers at lower edges of the front, back, and sleeve, and the single large perforation in the under-sleeve section which shows the proper location for the cuff seam.
It may be left to your judgment whether you will make the waist entirely by hand or use the machine when practicable.
The hand-made blouse is exquisite, but time may be a consideration, and the machine is then to be preferred. If you make the little tucks by machine and your material is exceptionally fine, try basting a piece of wrapping paper under the tuck fold.
You will obtain a straight firm line by stitching through material and paper and can then very easily tear the paper away. The tucks, which should turn toward the armhole when finished, are made by creasing at the small perforations and stitching one-fourth inch from the crease.
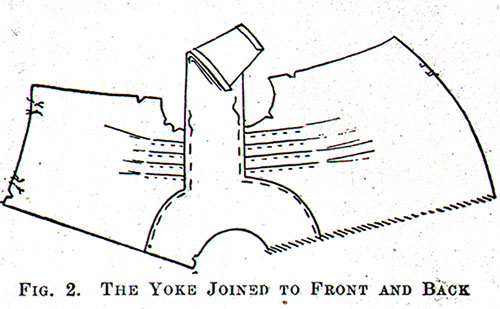
To attach the yoke, turn under the yoke edges front and hack, and the side edges of the sleeve extensions three-eighths inch, which is the amount of the seam allowance.
Lap the yoke over the upper edges of front and hack as shown in Fig. 2. but not farther than the three-eighths inch.
See that the notches at the tucked edges, double notches in front and single in back, match corresponding notches in the yoke., then baste the yoke to position.
Now close the underarm seams, that is, baste the side edge of front to the side edge of the back, the single notches together. Notches indicate center-hack in the neck and lower edges.
Turn under the right back edge at the notches for a hem, but allow the left edge to extend to form an underlap. Merely pin the hem under and then gather lower edges of front and hack between the double perforations.
The waist may now be tried on. Pull it down well to keep the yoke smooth. Alter, if necessary, at the under-arm seams and at center-back. If the gathers need to be raised, indicate the proper position with pins here and there.
Make French seams at underarm that is. Stitch first on the right side and then on the wrong, concealing the raw edges when making the second stitching.
The under-section of the sleeve has three notches on one side and four on the other. There are similar notches in the turned-under edges of the yoke extension which forms the upper section of the sleeve. Lap the upper part over the under with these notches matching and baste in place.
Baste the top of the under-sleeve section to the armhole edge with single and double notches, together. Gather the lower edge of the sleeve and then try the waist on again to see if the sleeve is correct. If it is, stitch the armhole seam and finish it neatly.
If you are using embroidery to trim the front, now is the time to apply it. The yoke must be ripped away at the middle and the gathering thread at the lower edge removed.
Then lay the embroidery flat on the front, with centers together and upper edges even; baste carefully along both sides, following every irregularity of the edge.
Stitch as basted and cut away the material underneath, leaving enough for, turning a tiny hem just under the stitched edge. Sew the hem by hand or machine-stitch, as preferred.
When a fine thread is used the stitching is almost invisible. Baste the yoke in place again and regather the lower edge.
To apply tile insertion outlining yoke and sleeve, baste it on the yoke piece so that one edge comes just over the edge of the yoke. First, attach the other edge of the lace with fine hand stitches; I do not think you can manage to use the machine over the sleeve.
You must miter the insertion at the yoke corners and open out the hem at the back. Now rip the bastings that attach the yoke piece, including sleeve extension, to the rest of the waist and turn the ripped edge back underneath. In its place baste the free edge of the insertion. Sew as basted and make the small finishing hem.
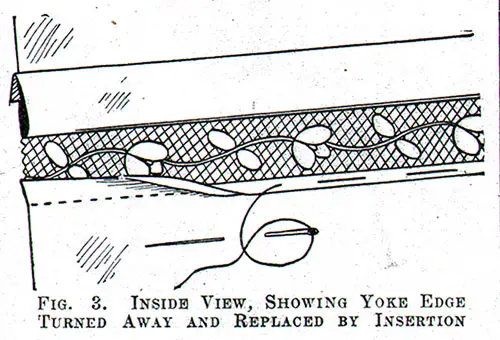
Figure 3 shows the yoke edge turned away and tile hem being made at the other edge. Cut off the yoke edge except what you need for the hem finish. However, if the material of the yoke is such that a fine hem cannot be made, merely turn the raw edge back and fasten with a small running stitch.
There is room on the yoke for another row of insertion, and this should be placed so that it will come midway between the lower edge of the collar and the row already applied.
Let this row extend across the shoulder to the hack as shown in the finished view of the waist. After sewing it in place, cut the material underneath and finish by turning back or hemming as already described.
In the same manner, apply the insertion to the collar. Baste the three rows in place, the top row three-eighths inch be.
If the upper edge of the collar piece, the bottom row three-eighths inch above the lower edge, and the remaining row midway between, stitch along all but the highest and lowest edges of Insertion.
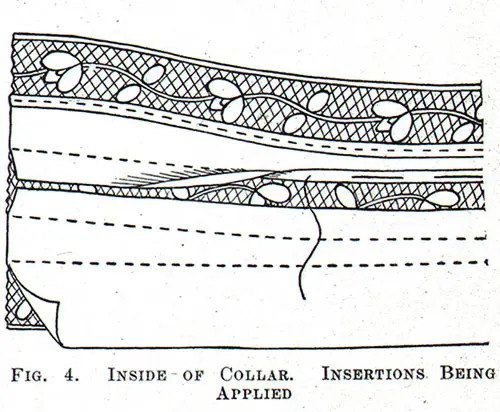
Cut the material away under the top and bottom rows and turn the narrow hems, the material permitting. Then cut once under the middle row through the center and turn these edges back for the hems. The collar, partly finished, is illustrated in Fig. 4.
The hem is made at the top, the second hem is being basted, and the material is still to be cut away under the lowest insertion. The edge of this Insertion is finally sewed to the neck edge and the neck edge clipped and stitched under.
Finish both edges of the cuff with insertion, treating it like the top and bottom rows of the collar, and whip on the edging, fulling It slightly. Close the cuff seam, making a French seam of It, beginning at the bottom, so the ends of the lace edging will be evenly joined.
Sew the upper edge to lower edge of the sleeve, placing the cuff seam at the single large perforation on the underside of the sleeve. Then turn the sleeve edge up and sew It.
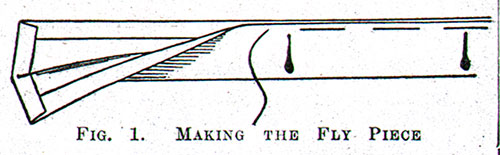
Use a fly for the closing at the back, but first baste the hem at right side. Cut the fly twice the width of the hem and then add three-fourths of an inch for finishing. Fold it lengthwise through the middle, turn the edges inside and haste.
Work button-holes about three Inches apart and baste the back edge, the turned-in side, along the tile back edge of the hem, on the Inside of the waist. Stitch from the outside, finishing the hem and attaching the fly at the same time.
Between the buttonholes, tack the fly to the hem. Figure 1 illustrates the fly before it is attached. Finish the left back edge of the waist with an under facing not wider than the hem and sew on the buttons.
The collar can be fastened prettily with loops and tiny buttons and need not lap more than one-fourth Inch at closing edges. Make narrow hems at these edges and whip the edging to the upper edge.
For a transparent collar, there is nothing more satisfactory In the way of collar supports than those made out of fine silk-covered wire. Support should be placed at each side and the ends.
Finish the lower and back edges of the peplum with very small hems. Then turn under the upper edge, after clipping It here and there, and lay It over the gathers, placing the underarm seam so that it will not be drawn forward or backward and arranging most of the gathers at the middle of front and back.
After stitchIng, turn the seam edges down, lay a piece of tape or facing of the material over the raw edges and stitch along both sides. This makes a flat smooth joining which is most desirable at the waistline. The next lesson will be “The Skirt of the Lingerie Dress.”
Pattern Information
Ladies’ Lingerie Shirt-waist, No. 5367. The waist is cut with yoke and upper part of the sleeve in one. Six sizes, 32 to 42 inches bust measure. The medium size requires 2 1/4 yards of 36-inch material, 1/2-yard-wide insertion, 6 3/8 yards of narrow insertion, and 1 1/8 yards of lace edging. Price of pattern, 15 cents.
Maxwell, Alice, “The Lingerie Shirt Waist,” in The Modern Priscilla, Vol. XXV, No. 2, Boston, The Priscilla Publishing Co., April 1911, p. 32 & 55.
Note: We have edited this text to correct grammatical errors and improve word choice to clarify the article for today’s readers. Changes made are typically minor, and we often left passive text “as is.” Those who need to quote the article directly should verify any changes by reviewing the original material.
