
How to Fold Napkins Properly - 1889
"How to Fold Napkins: With Many Handsome Styles and Diagrams Which Show How it is Done," Appendix to the Steward's Handbook, Chicago: Jessup Whitehead, 1888.
Introduction to Folding Napkins
In the days of our forefathers, the quantity and quality of the viands were thought of more consideration than the appointments of the table. Provided the hospitable board groaned beneath the combined weight of substantial food and a silver service, the banquet was pronounced magnificent. Now we have changed all that.
The contents of the dishes have become secondary in importance to the decorations. The eye must be feasted as well as the palate. Heavy silver ornaments have given place, or at least are associated with, vases of crystal and abundance of flowers, with scent fountains and the choice fruit selected for dessert.
The folding of the serviette, or table napkin, was always a matter of attention; at the present moment it is doubly so when the luxury of table decorations are carried to such an extent that ingenuity is constantly on the strain, not only to produce every possible variety of cartes de menu, but even fanciful stands to hold them or the guests' name cards in a prominent position.
The parlor maid or the waiter, or the dainty mistress of the house herself, must look to their laurels in the matter of folding serviettes, or the other showy trifles placed on the board will cast the attractions of the table napkin completely into the shade.
To fold them well in the more elaborate styles, it is necessary that they should be made of very fine, but rather stout damask, starched more or less, quite fresh and nearly new. Old damask that is soft will not take the more elaborate forms.
Folding Napkins Appropriately For Each Occasion
Each serviette, previous to folding it, should be laid on the ironing-board damped with (raw) starch, smoothed with a hot iron, and immediately folded whilst crisp and steaming. It not only folds better but preserves the form longer by such means; and unless this is attended to designs like "the Fan," "the Victoria Regia," "the Bridal," and "the Colonne de Triomphe," could not effectually be made. "The Boat" and "the Basket" also require very stiff serviettes. The serviettes must be exactly square, and pains taken to make the sides perfectly even and true.
The folding of the serviette may often be made complementary to the guest. Not only does "the Bridal" point out its special application; but "the Crown," "the Prince of Wales's Feather," and "the Mitre". "The Boat" is appropriate when a naval chief is the honored guest; "the Colonne de Triomphe," for the entertainment of a hero fresh from a new victory; " the Victoria Regia" for a distinguished botanist, and "the Fan" for a reigning belle, so may "the Cocked Hat" be made available when a military hero is entertained, and "the Heraldic Rose" for a guest whose hobby is with things that appertain to the board.
Ways to Fold Napkins
- The Escutcheon
- The Chestnut Pocket
- The Shield
- The Mitre
- The Cornucopia
- The Crown
- The Scroll
- The Slippers
- The Cocked Hat, or Boat
- Another Boat
- The Hamburg Drum
- The Heraldic Rose and Star
- The Minarettes
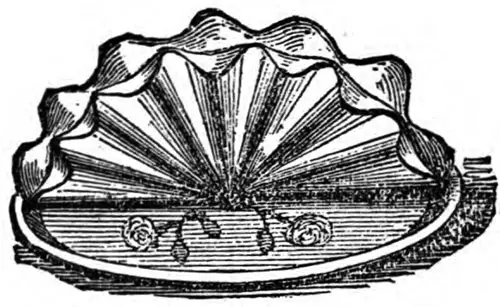
- The Shell
- The Fan
- The Rosette Fan
- The Victoria Regia
- The Swan
- Lorgnettes
- The Pyramid
- The Fleur-de-Lys
- The Archbishop's, or Double Mitre
- The Bread Basket
- The Flower Basket
- The Imperial Crown
- The Double Horn of Plenty
- The Colonne de Triomphe
- The Tulip
- The Bridal Serviette
- The Prince of Wales's Feather
- The Arrow Head
- The Menu Holder
- Mercury's Cap
- The Sail Boat
The Escutcheon
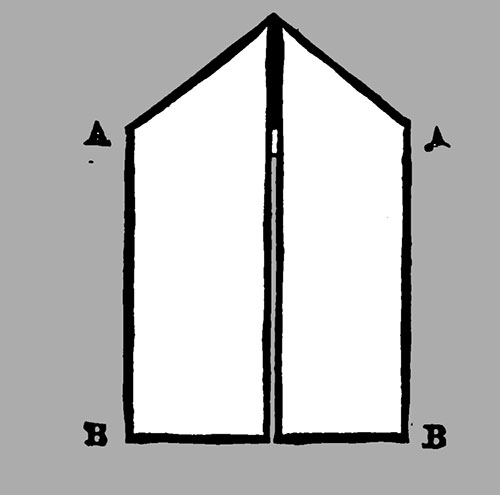
Figure 1: The Escutcheon
This is one of the easiest methods possible of ornamentally folding a serviette, and we recommend a novice to commence with it. Indeed, we have arranged the folding as progressively as possible.
Although it will sit crisper and fresher in appearance if made with a fine new well-starched material, the Escutcheon can be made very well with old or even crumpled damask, though, of course, serviettes should always be scrupulously clean and smooth.
First, fold the serviette in half lengthwise; and then fold it in half again lengthwise, keeping the edges to the lower end, which comes wherein the diagram A A and B B are marked (see Fig.1).
It is necessary to be always very precise in making the folds, bringing the edges and corners exactly to meet, a rule which applies to all the designs; but without strict attention to which, the more elaborate patterns cannot be represented.
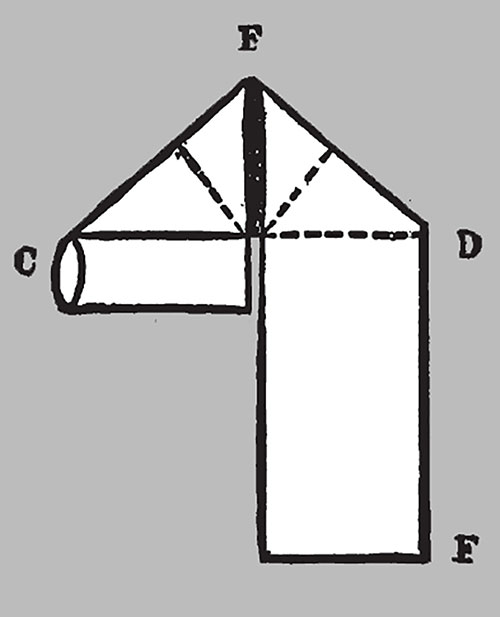
Figure 2: Folding the Escutcheon
Now turn over each end of the serviette (which you have already folded in four), in the manner shown in Fig. 1, creasing it quite flat. Then take one of the ends and roll it up in the manner shown in Fig. 2, from C to D.
Take the other end, E, and roll it in the same way. It is Fig. 4 to be observed that these rolls are brought exactly to meet (not to overlap) the triangle formed at the top.
It is, however, necessary to remark that the napkin is to be rolled in the reverse way from that apparent in the illustration; that is, to be rolled under and not over, a difference which must not be neglected.
Keep the rolls one in each hand, and with a twist of the wrist bring over the roll C, to the point F (causing the fold marked by the dotted line), and with a twist of the other wrist bring the roll up to the same point to match it.
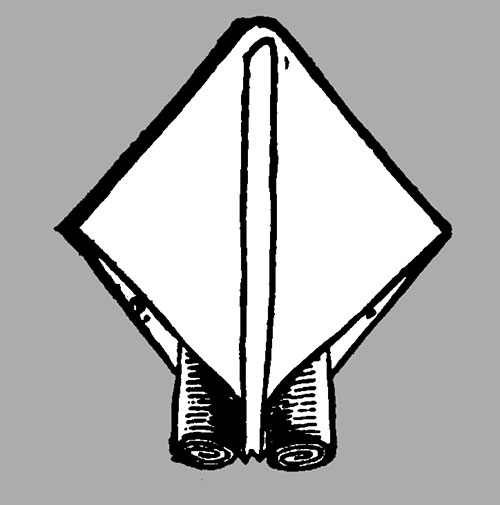
Figure 3: Folding the Escutcheon
Then lay it flat on the table, the rolls underneath (see Fig. 3), and keeping them down with the hand, raise the other part and shape it as shown in Fig. 4, and slip the dinner roll in the hollow at the back.
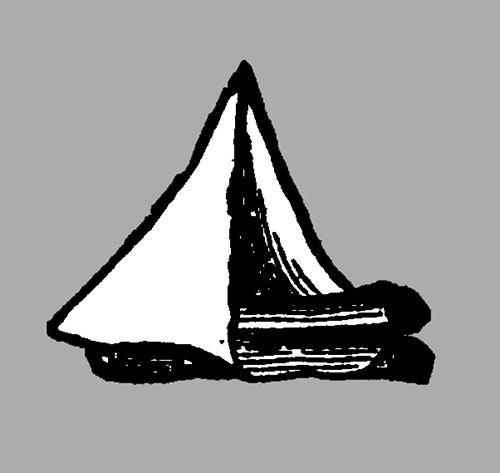
Figure 4: The Folded Escutcheon
The Chestnut Pocket
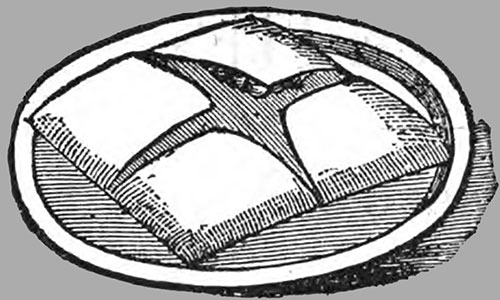
Figure 1: The Chestnut Pocket
Fold the serviette in half both ways and open it again. Bring all the corners to the center. Turn it over and again bring all the corners to the center. Turn it back again and slip the chestnuts in the four pockets to be observed in Fig. 1.
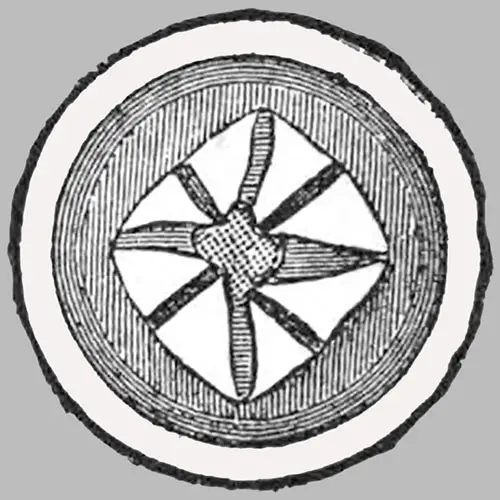
Figure 2: The Chestnut Pocket
Fig. 2, the Pocket Serviette, is made in the same way; but the corners are
brought three times, instead of twice, to the center, turning it each time (see Fig. 2).
The Shield
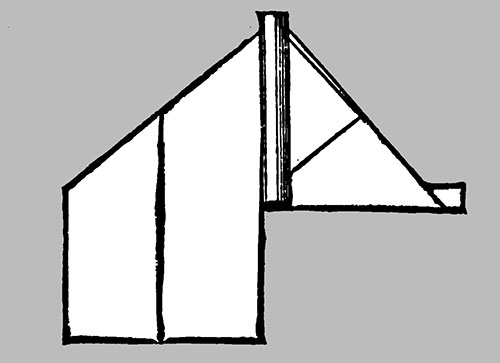
Figure 1: The Shield
The Shield is almost identical with the Escutcheon; there is, however, a slight difference, which forms a little variety and practice in the art of napkin folding.
First form Fig. 1, as for the Escutcheon. Next roll up the two ends; that is, make the rolls outwardly, not under as in the previous direction.
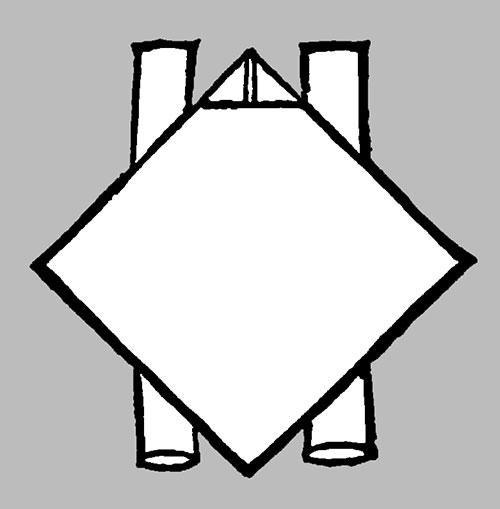
Figure 2: The Shield
The serviette will now resemble Fig. 2. Then set it into form and place the bread inside. The face of it will stand perfectly upright and resemble Figure 3.

Figure 3: The Shield
The Mitre
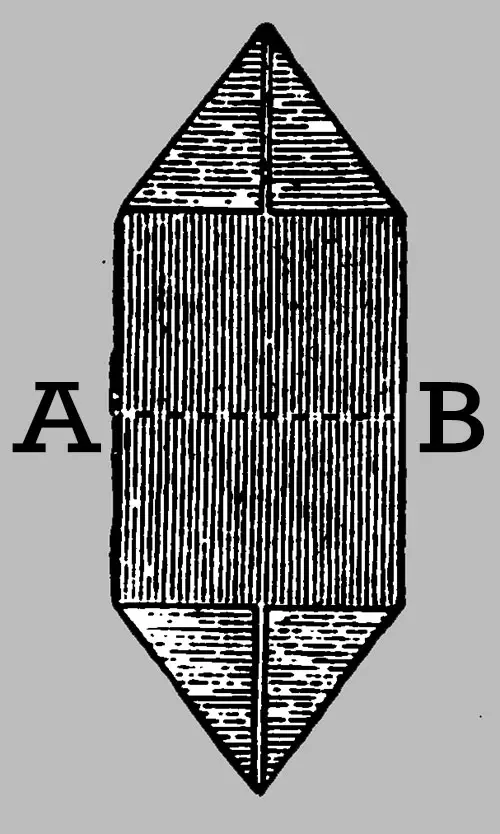
Figure 1: The Mitre
The Mitre is a well-known device and one which always looks effective. It is not unlike the Crown. Fold the damask in half, and turn down the two corners to meet at both ends, in the manner shown in Fig. 1, taking care to let them meet very exactly and not overlap. Fold it in half at the line A to B, Fig. 1, to ascertain the center.
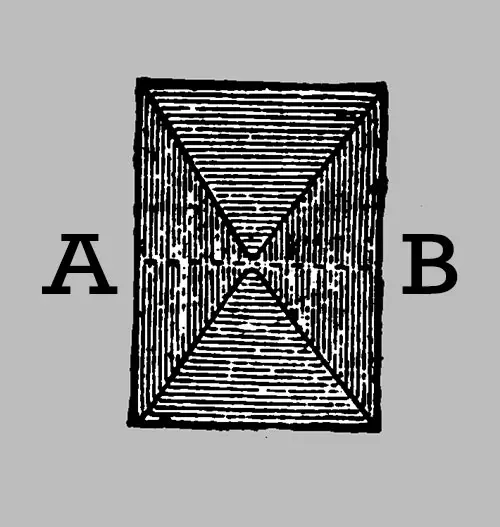
Figure 2: The Mitre
Open this last fold again and bring the two points to the center like Fig. 2. Fold these together at the dotted line with the points outside, let down one of these corners again, and turn in the two points A and B also, to make a triangle uniform with the others; it will now resemble Fig. 3.

Figure 3: The Mitre
Turn the serviette over; let down the point on that side; it will then resemble Fig. 4.
Figure 4: The Mitre
Turn in the corners A and B, by the line marked. Turn up the point D to its former position: it will now resemble Fig. 5.
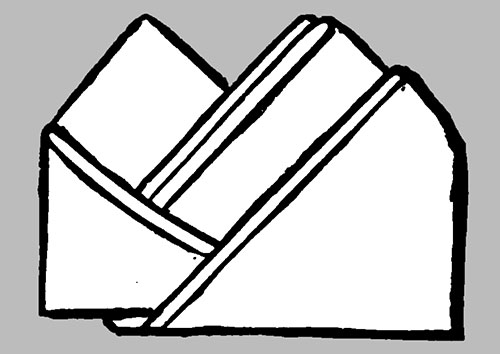
Figure 5: The Mitre
Slip the hand inside the hollow to be found at the broad end, and shape it like a cap as shown in Fig. 6, and the Mitre is complete.
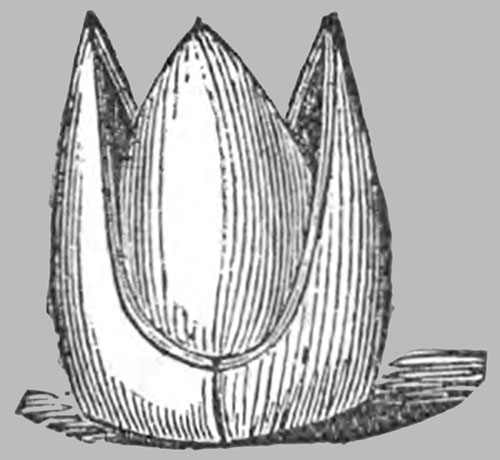
Figure 6: The Mitre
The Cornucopia

Figure 1: The Cornucopia
Cornucopias are easily folded, and very effective down a long dinner table, with a single scarlet geranium flower at the apex of each. Halve the serviette lengthways; turn down the corners at the two ends to meet in the center and form a triangle, like Fig. 4, in the Crown.
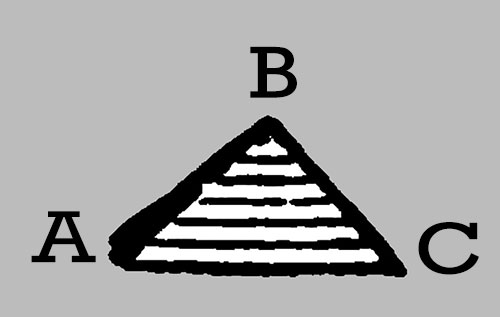
Figure 2: The Cornucopia
Take the corners at the base and bring them to the apex, like Fig. 1. Then double it together with folds inside: it will now appear like Fig. 2. At the side marked A, there are three folds.

Figure 3: The Folded Cornucopia
Set it upright over the dinner roll, with two of these folds one side and one on the other. Shape it nicely, keeping the space from B to C close.
The Crown
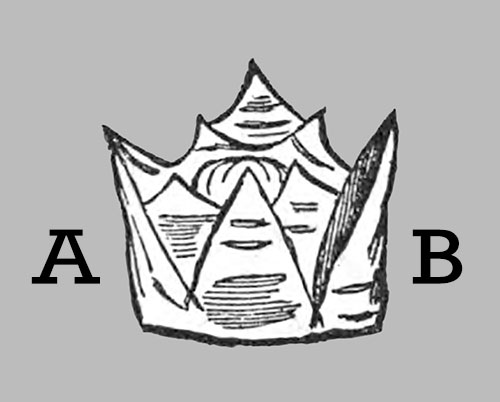
Figure 1: The Crown
This is a handsome design and is one which requires very well starched damask. The bread is placed inside, underneath the crown. Now that flowers are so much used, nothing could have a more charming effect than a slight wreath of flowers round the base of it, at the part marked A to B, in fig. 1. Fig. 2 represents the serviette laid on the table.
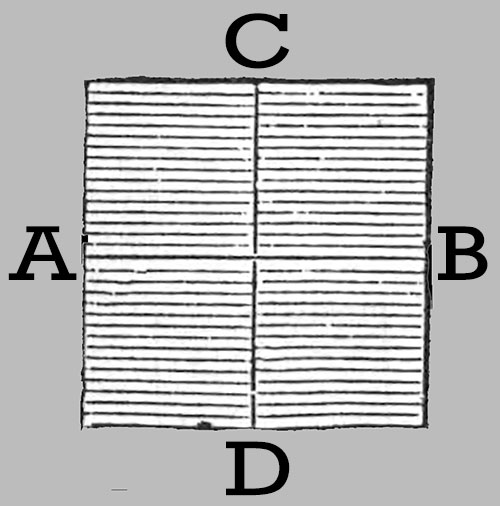
Figure 2: The Crown
Fold it exactly in half from A to B, open and fold the reverse way, from C to D. Open it again. These creases are merely made to ascertain the true center.
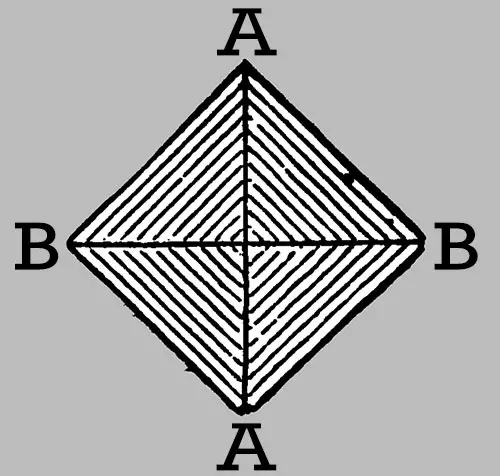
Figure 3: The Crown
As it lies, turn all the points to the center, and crease down in the manner observed in Fig. 3, which forms a diamond. Take the four corners of the diamond and fold them to the center again. The serviette will still preserve the shape shown in diagram Fig. 3 but be smaller in size.
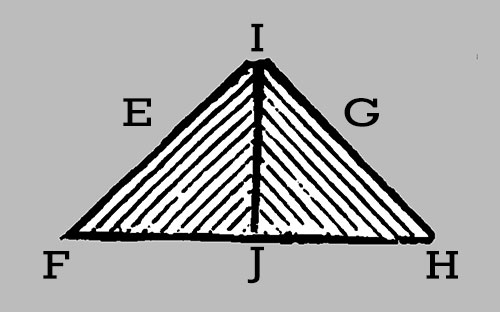
Figure 4: The Crown
Bring the top, A, to the right hand, B, and the left hand, B, to the other, A; it will now resemble Fig. 4. Fold down the corners, E F and G H, parallel to the line I J; it will now resemble Fig. 5.
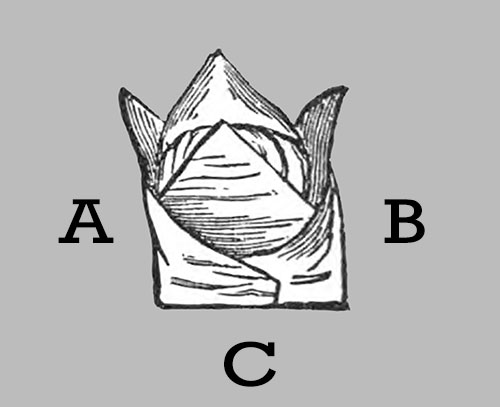
Figure 5: The Crown
Put the hand inside it at the broad end, and shape it like a cap, over the hand, folding one end into the other as shown at C, in Fig. 5. The stiffness of the damask should be sufficient to keep these last folds in place; the corner fold should just be turned one corner within the other as an envelope, and pinched, to secure its remaining firm.
The Scroll
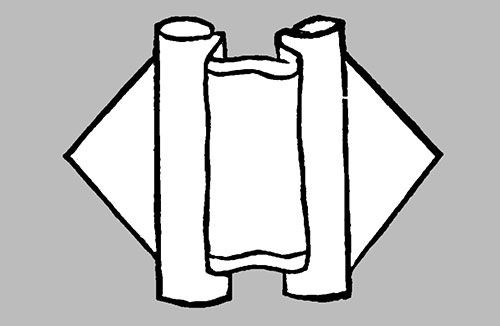
Figure 1: The Scroll
The Scroll is simple to fold. It is represented complete (Fig. 3). The bread is under the center, on which the name card may be laid. It does not require to be stiff. First fold the serviette four times lengthways. Fold down one end in the manner shown at A, in Fig. 2.
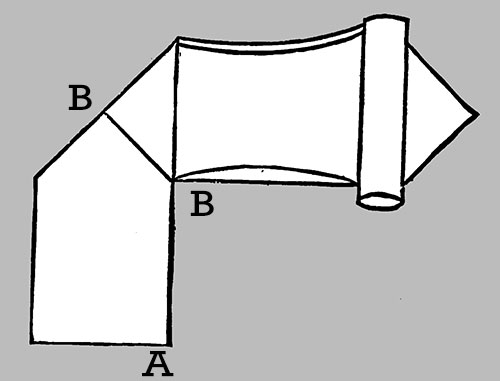
Figure 2: The Scroll
Then fold the end A completely across, forming the line, B B. Roll up the end A, and produce the Fig. 3. Treat the other side in the same way. Fig. 3 illustrates the process. The space in the middle, A, Fig. 1, is closed over the bread.
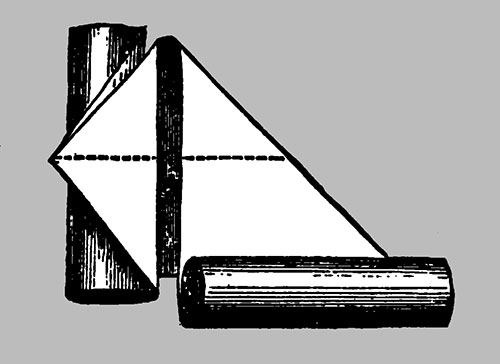
Figure 3: The Scroll