

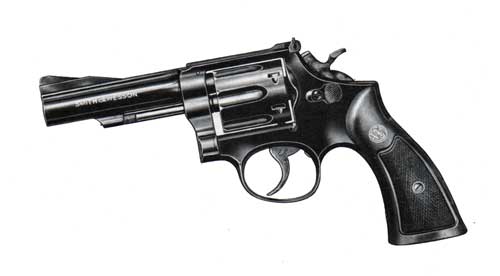
Smith & Wesson K-38 Combat Masterpiece Revolver Model No. 15 (1974)
PARTS LIST | INSTRUCTIONS FOR USE | MAINTENANCE | SPECIFICATIONS | GUARANTEE
SPECIFICATIONS
- Caliber .38 S&W Special
- Number of Shots 6
- Barrel 2", 4"
- Length Overall 9 1/8" With 4" barrel
- Weight Loaded 34 oz. With 4" barrel
- Sights
- Front: 1/8" Baughman Quick Draw on plain ramp.
- Rear: S&W Micrometer Click Sight, adjustable for windage and elevation.
- Frame Square butt with grooved tangs.
- Stocks Checked walnut Service with S&W monograms
- Finish S&W blue with sandblasting and serrations around sighting area to break up light reflections.
- Trigger S&W grooving with an adjustable trigger stop.
- Ammunition .38 S&W Special, .38 S&W Special Mid Range.
SCHEMATIC DIAGRAM
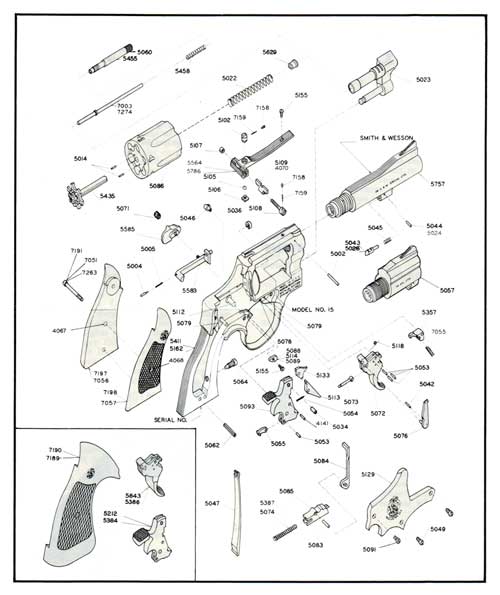
This schematic diagram and parts list conform to the current specifications provided by our Engineering Department. From time to time improvements are made in all our models.
For this reason, the gun which you own may not correspond exactly with the information provided on this sheet.
When requesting information or ordering parts for your gun, please provide the serial number and approximate date of purchase. 11-74
Function
The Smith & Wesson K-38 Combat Masterpiece target revolver is a 6-shot breech-loading hand weapon. It is produced with a solid frame and a swing-out type of cylinder, having 6 chambers around a central axis so that 6 shots may be fired before reloading is neessary.
The weapon may be fired either single action or double action, and cocking the hammer by either method causes the cylinder to rotate and align the next chamber with the barrel.
The rate of fire is limited only by the dexterity of the operator in reloading the cylinder and his ability to aim the weapon and pull the trigger.
Loading and firing tnis revolver is a comparatively simple operation, as follows:
Push the thumbpiece forward. This will release the cylinder so that it may be swung out to the left side for loading.
Holding the gun so that the cylinder is in its outermost position, and with the muzzle pointing downward, insert cartridges in the charge holes making certain that they are firmly seated.
Return the cylinder to its original position in the frame, pressing it firmly into place to make sure that it locks in alignment. The gun is now ready to fire.
In single action shooting the hammer is pulled or cocked to its extreme rearward position. The gun may then be fired by merely pressing the trigger.
This type of shooting is used for deliberate fire where there is time to sight the gun carefully and squeeze the trigger in an unhurried fashion.
It is also used in competitive shooting for not only slow fire but also for timed fire, whereby 20 seconds are allowed for the firing of each 5 shots, and rapid fire where 10 seconds are allowed for the firing of each 5 shots.
There is time even in rapid fire shooting for the deliberate handling of the gun in single action fashion just so long as the function is performed without loss of time and in a definite cadence whereby the cycle will be completed within the allocated time.
Where time or other circumstances do not allow for single action fire the revolver is used double action.
To fire double action all that is necessary is to align the weapon with the object which you wish to hit and pull the trigger firmly all of the way to the rear.
This will cause the hammer to rise to its full cocked position and then fall to explode the cartridge, and as previously stated the only limit to the speed with which a weapon can be manipulated in this fashion will be determined by the dexterity of the shooter.
This type of shooting is required in combat work or under emergency conditions where the gun must be used with great speed.
To extract the fire cases press the thumbpiece forward and swing the cylinder out tq the left side.
Turn the gun muzzle upward and holding the cylinder in its extreme outward position press down sharply on the extractor rod. This will eject the fired cases down and out of the gun, which is now ready to reload.
PARTS LIST
Smith & Wesson will refinish handguns of its own manufacture. No change of finish is offered on the Victory or Airweight® model or on Models 28, 39, 59, 64, 65, 66 or 67. Repair or replacement of parts are in addition to refinishing price.
SERVICE
Should your Smith & Wesson revolver require adjustment, repair, or refinishing, we recommend most sincerely that the weapon be returned to the factory or authorized service center. There is no other way to insure that the work will be done in a properly equipped and staffed shop.
Charges are very reasonable, being based on the cost of parts replaced plus a labor charge for the time expended on the job. A labor charge for one hour is usually sufficient to cover all but eery extensive overhaul jobs.
Revolvers returned to the factory or authorized service center should he MARKED FOR THE ATTENTION OF THE SERVICE DEPARTMENT.
A letter of instructions should he enclosed with the gun, and shipment by individuals must be made by Prepaid Railway Express. Adherence to these suggestions w ill prevent loss of time in handdling at the factory.
When returning guns for service, please remove custom stocks and holsters. We cannot assume responsibility for these items.
When your revolver arrives for service, it will be very carefully inspected, together with your letter of instructions.
Next, a quotation covering total cost of work to be performed will be sent to you. No actual work will he commenced before receiving your approval of our quotation unless you specifically authorize us to do so.
SEE YOUR AUTHORIZED SMITH & WESSON WARRANTY AND SERVICE CENTERS LIST FOR YOUR LOCAL SERVICE CENTER
FULL ONE YEAR WARRANTY
Smith & Wesson handguns are warranted to be free from defects in material and workmanship.
Any such defect of which Smith & Wesson is given written notice as provided below within twelve months and ten days from the date of first purchase by a consumer will be remedied by Smith & Wesson without charge.
This warranty is granted by Smith & Wesson, a division of Bangor Punta Operations, Inc., 2100 Roosevelt Avenue,. Springfield, Massachusetts 01101. It extends to any owner of a Smith & Wesson handgun or shotgun manufactured after July 4, 1975.
Warranty claims (in writing) and the gun concerned should be directed (transportation charges prepaid) to the WARRANTY SERVICE DEPARTMENT at the nearest Smith & Wesson Warranty Service Center, addresses of which appear on the list separately enclosed with each gun.
Warranty claims should state the model and serial number of the gun concerned, a description of the difficulty experienced, and the date and place of purchase. It is recommended that shipments be insured by owner, since Smith & Wesson will accept no responsibility for loss or damage in transit.
Transportation and insurance charges for return to owner will be paid by Smith & Wesson if the related claim is accepted by Smith & Wesson for warranty work.
Smith & Wesson will not be responsible for the results of careless handling, unauthorized adjustments, defective or improper ammunition, corrosion, neglect, ordinary wear and tear, or unreasonable use.
This warranty has been drafted to comply with the new Federal law applicable to products manufactured after July 4, 1975.
PLEASE NOTE
Handguns are classified as FIREARMS or DANGEROUS WEAPONS. Guns are surrendered by Smith & Wesson with the express understanding that it assumes no responsibility for re-sale or safe handling under local laws and regulations.
The information card packed with each gun should be promptly completed upon purchase and returned to Smith & Wesson.
HELPFUL HINTS
- Push thumb piece forward, swing out cylinder and load.
- Close cylinder and take position on firing line.
- STAND in a relaxed and comfortable position, feet well apart. The arm when raised should line naturally with the target. If it does not, shift the feet a bit.
- HOLD the gun firmly but do not seize it with a "death grip:' If the knuckles are white, the grip is too tight .
- LINE the sights carefully, top of front sight even with top of rear notch, and light equal on both sides of front sight (see illustration).
- SQUEEZE the trigger with trigger finger only, carefully keeping the sights aligned on the target. SQUEEZE is the most important function of shooting. A pull or yank on the trigger will surely disturb alignment and result in a poorly placed shot or a complete miss. DO NOT apply the SQUEEZE with the whole hand. The squeeze should be applied between the tip and first joint of the trigger finger. Slowly at first — speed will develop with practice.
- Watch the sights. Learn to "call your shots" before looking for them on the target. Practice "dry shooting" with empty gun. Watch sights when hammer falls. If sights jump or duck you are not squeezing the trigger. Don't hold the shot too long. If the sights don't line up on the target in 15 seconds, take the arm down and rest for a moment. Remember, good revolver shots are not born; they are made by careful and consistent practice.
SIGHT ADJUSTMENT
- Front sight is fixed. All adjustments must be made at the rear sight.
- Move the rear sight in the direction in which you wish the group on the target to move. (If group must be higher, elevate the rear sight. If group must go to the right, move the rear sight to the right, etc.)
- To elevate rear sight turn top (elevating) screw to the left, or counter-clockwise. To depress rear sight turn top (elevating) screw to the right, or clockwise.
- To move rear sight to right, turn side (windage) screw to the right, or clockwise. To move rear sight to left, turn side (windage) screw to the left, or counter-clockwise.
- Each click of the rear sight moves the point of impact on the target approximately 3/8" elevation and 1/4" windage at 50 yards and half of that amount at 25 yards.
INSTRUCTIONS FOR USE
Care and Cleaning
Many weapons require stripping or at least partial disassembly in order to clean and oil them properly. This does not apply to the revolver, which may be cleaned and lubricated under all normal circumstances without removing a single pin or screw.
If at any time disassembly of the weapon is indicated for repairs, etc. it is recommended that the gun be returned to the factory, or you should at least employ the services of a qualified gunsmith.
To keep revolvers in proper condition, and to insure perfect functioning in time of need, it is essential that they be kept clean and coated with a rust inhibiting oil. Care is required to prevent rust, especially in damp, humid climates, or when sweaty hands come in contact with the guns.
To clean the revolver as required when the weapon is not fired, or when kept in storage, rub it externally with a lightly oiled cloth, and then swab out the bore and cylinder chambers with an oily flannel patch.
Remove excess oil but leave a light film to protect the arm against rusting. Clean out all crevices with a small clean brush.
For cleaning after firing, scrub out the bore and chambers with an approved nitro solvent, and then use a brush dipped in solvent to remove all deposits from around the breech of the barrel, extractor head, and other adjacent areas which have been subjected to the action of powder or primer residue.
If there is any evidence of lead particles, or other foreign matter left in bore or chambers, it is well to scrub these parts further with a bronze or brass brush dipped in powder solvent.
The area under the extractor should be cleaned frequently and kept dry, as an accumulation of powder residue can cause the cylinder to bind.
After cleaning off the entire gun with nitro or powder solvent, remove all traces of the solvent, both on the exterior of the gun and in the bore and chambers, following immediately thereafter with the application of a light film of oil.
Note that there is usually some residue in the steel of both barrel and cylinder that works out and becomes apparent within from 24 hours to 48 hours after the initial cleaning.
This can be removed with a bristle brush with perhaps a light re-application of powder solvent, after which the oil film should be re-established on all surfaces.
The above applies if ammunition used is of American manufacture, incorporating smokeless powders and non-corrosive primers. If other than smokeless powders and non-corrosive primers are used in these revolvers then cleaning methods should be adjusted accordingly.
Do not store revolvers with a plug in the barrel, since this is a contributing factor to sweating.
By the same token, maintenance or storage rooms should be kept at a constant temperature with the least possible humidity, and the guns should not be stored encased in anything which will attract or hold moisture, such as leather.
If revolvers are to be stored for a long period of time, the internal mechanism of the lockwork should be heavily oiled with an acid free lubricating oil, and the exterior of the guns, as well as the bore of the barrel and the charge holes of the cylinder, should be heavily coated with an anti-rust oil.
It is an established fact that moisture is the greatest enemy of metallic objects, particularly climates where temperature and humidity are high, and salt air is present.
Extreme care should be exercised that all metallic surfaces be kept clean and oiled, and the wood stocks on the revolvers should be inspected for cracks caused by moisture.
A periodical coat of raw linseed oil, well rubbed in with the hand, will help to prevent the splitting of stocks, but care must be exercised that the linseed oil does not get into the mechanism or on moving parts, as it has a tendency to gum when dry.
Safety Precautions
Before proceeding to use this weapon, a word of caution is in order. This gun is as safe to handle and use as we can make it, but there is no foolproof firearm.
Used correctly by a competent person the revolver is one of the safest handguns. There are many safety rules but those found below are basic, and should be observed rigidly until they become second nature.
- The gun must always be checked for live ammunition when picked up, drawn from the holster, or handed to or accepted from another individual.
- The gun should always be holstered except when drawn for a definite purpose.
- Never point the revolver at anything that you do not intend to shoot.
- Do not cock the gun unless you intend to shoot it. Do not even insert the finger in the trigger guard until you are ready to fire.
- Dry-snapping, even with dummy cartridges, should be discouraged unless same is performed on a regular target range or at a known inanimate target object.
- When the handgun is out of the holster and held in a ready position, be absolutely certain that it is not pointing at any part of yourself or the persons of others who are in your immediate vicinity.
- Beware of obstructions in the barrel. If, when firing, a weak or peculiar report is heard, cease firing at once and inspect the barrel for an obstruction. A stuck bullet, or any other object in the barrel, should be removed immediately, since even a plug of mud, snow, twigs, or an abnormal quantity of heavy grease in the bore, may result in a bulged or burst barrel.
- At all times treat the revolver as the precision instrument that it actually is.
MAKE SAFE GUN HANDLING A HABIT.
01-1274-53
Smith & Wesson
A Bangor Punta Company
GG Archives REF: BPS&W-014-1974-BW-BRO